-
OpenVPN 서버구축 (Linux, debian) [2024년 2월판]카테고리 없음 2024. 2. 26. 19:55
기준 : Debian 10
0. 들어가며
나는 처음에 OpenVPN을 통하여 VPN을 만드려고 할 때 인터넷에서 openVPN을 설정하는 정보는 많이 나오는데 대부분 옛날 자료이고, 리눅스 서버 전문가가 잘 익힐 정보의 문장을 적었다. 영어로 openvpn설정하는 법을 구글링하면 제대로 된 정보가 나온다. 나는 한글을 잘 읽을 수 있고 컴맹인 사람도 포함해 openvpn 설정을 쉽게하기 위해 글을 작성하는 것을 노력했다.
우리는 데비안OS를 통하여 openVPN vpn기능을 활성화 시킬것이다.
흔히 알려져 있는 리눅스 OS 버전은 우분투가 있는데 나는 우분투가 아니라 데비안OS로 이용하기를 추천한다. 우분투는 리눅스 OS로 돌리기에는 불안하다. 즉, 오류가 바로 생겨서 작동이 정지될 수 있다. 데비안 OS는 우분투보다 안정적이어서 나는 데비안 OS로 openVPN 설정하기를 추천한다.
Debian OS 설치방법
기준 : Debian 10 이번에는 OpenVPN설치를 위해 Debian OS를 설치합니다. 일단 부팅디스크를 만들어주세요. (USB, CD이용) 먼저 하늘색 박스를, Graphic install에 위치하고 엔터를 칩니다. 한국어를 고르고 Co.
hiteit.tistory.com
Linux(debian) 에서 일반 계정을 관리자 계정으로 설정하기
데비안(debian)OS로 컴퓨터에 설치할 때, 계정을 생성하게 되는데 관리자 계정이 아닌 일반 계정으로 생성을 하게 된다. 설치 후 계정실행을 통해 터미널(Terminal)로 sudo라는 명령을 통해 임시적으로
hiteit.tistory.com
네모 표안에 왼쪽의 $표시는 무시하고 글을 읽고 실행할 때 오른쪽 문장을 복사해서 터미널 창에 붙여놓으면 된다.
옅은 남색 안의 글씨는 알맞게 자신이 스스로 고쳐야 하는 것이다.
OpenVPN 활성화를 했을때 접속하려는 기기에서 서버의 IP주소가 떠야 성공이다.
1. 서버의 인증서를 만들기
1.1 apt를 업데이트 하고 openvpn과 easy-rsa를 설치한다.
$
$sudo apt update
sudo apt install openvpn easy-rsaEasyRSA에 관한 정보는 아래 링크에 걸어놓는다.(작성일 당시 현재버전은 3.1.0)
https://github.com/OpenVPN/easy-rsa/releases
Releases · OpenVPN/easy-rsa
easy-rsa - Simple shell based CA utility. Contribute to OpenVPN/easy-rsa development by creating an account on GitHub.
github.com
터미널 창에서 설치 명령어가 적히고 다음과 같은 묻는 문장이 나온다.
0개 업그레이드, [n]개 새로 설치, 0개 제거 및 0개 업그레이드 안 함.
[n] k바이트 아카이브를 받아야 합니다.
이 작업 후 [n] k바이트의 디스크 공간을 더 사용하게 됩니다.
계속 하시겠습니까? [Y/n]([n]은 임의의 수)
y를 입력하고 엔터키를 누르면 다운 명령을 계속 실행한다.
1.2 홈 파일에서 easy-rsa파일을 만든다.
$ mkdir ~/easy-rsa 1.3 컴퓨터에 설치된 EasyRSA 폴더를 홈에서의 easy-rsa 폴더에 링크를 건다.
$ ln -s /usr/share/easy-rsa/* ~/easy-rsa/ 홈에서의 easy-rsa파일을 다음과 같이 터미널에 입력해서 설정한다.
$ chmod -R 777 ~/easy-rsa 1.4
easy-rsa 파일로 이동한다.
그리도 EasyRSA의 초기화 옵션인 init-pki를 추가해 EasyRSA 서버를 구축한다.
$
$cd ~/easy-rsa
./easyrsa init-pki이어서
Note: using Easy-RSA configuration from: ./vars
init-pki complete; you may now create a CA or requests.
Your newly created PKI dir is: /home/사용자 계정/easy-rsa/pki1.5 이제 easyrsa로 인증서와 키 파일을 생성한다.
매번 비번을 넣기 번거로우므로 nopass 옵션도 준다.
$ ./easyrsa build-ca nopass 명령을 실행하면 터미널 창 맨밑에 Common Name을 묻는 란이 나온다.
Common Name (eg: your user, host, or server name) [Easy-RSA CA]:
Common Name은 인증서를 만들때 참조할 인증기관을 말한다. 특별히 입력할게 없다면 그냥 엔터를 치고 넘어간다. 그런 기본 인증기관이 지정이 된다.
CA creation complete and you may now import and sign cert requests.
Your new CA certificate file for publishing is at:
/home/사용자 계정/easy-rsa/pki/ca.crt위와 같은 3개의 구문이 나오면서 작업은 끝났다.
1.6 이번에는 openVPN에서 사용할 인증서와 key파일을 만든다.
이번에는gen-req 옵션을 주고 바로 다음에 인증서를 사용할 장비의 이름을 넣는다. 장비이름은 그냥 예제를 따라서 server라고 한다. nopass 옵션도 준다.
$ ./easyrsa gen-req server nopass Common Name (eg: your user, host, or server name) [server]: 명령을 실행하면 위와 같은 터미널 창 맨밑에 인증서를 사용할 이름을 묻는 구문이 나온다. 옵션에 server라고 줬기 때문에 그냥 엔터를 누르면 server라고 생성됩니다.
그리고 reg파일, key파일 두개가 나오면서 결과가 아래와 같이 리턴이 된다.
Keypair and certificate request completed. Your files are:
req: /home/사용자 계정/easy-rsa/pki/reqs/server.req
key: /home/사용자 계정/easy-rsa/pki/private/server.keykey 파일과 certificate request 파일이 생성되었다.
1.7 openVPN 디렉터리에 key파일을 복사한다.
(openVPN 디렉터리는 /etc/openvpn/)
$ sudo cp ~/easy-rsa/pki/private/server.key /etc/openvpn/server/ 1.8 인증서 파일을 만들 차례이다.
easyras에 sign-req 옵션을 준다. request 타입은 client와 server가 있는데 server로 준다. 아래 명령에서 첫번째 server를 말한다. 마지막에 오는 server는 key파일의 이름이다.
$ ./easyrsa sign-req server server 명령을 실행하면 아래와 같이 리턴이 된다.
Note: using Easy-RSA configuration from: ./vars
You are about to sign the following certificate.
Please check over the details shown below for accuracy. Note that this request
has not been cryptographically verified. Please be sure it came from a trusted
source or that you have verified the request checksum with the sender.
Request subject, to be signed as a server certificate for 3650 days:
subject=
commonName = server
Type the word 'yes' to continue, or any other input to abort.
Confirm request details: yes옅은 노란색 안의 글자는 스스로 yes라고 입력해야 한다.
실행이 완료되면 아래와 같은 구문이 적혀 지면서 server.crt파일이 만들어 진다.
Certificate created at: /home/사용자 계정/easy-rsa/pki/issued/server.crt 1.9 생성된 server.crt 파일과 ca.crt 파일을 openVPN 폴더로 복사한다.
$
$sudo cp ~/easy-rsa/pki/issued/server.crt /etc/openvpn/server/
sudo cp ~/easy-rsa/pki/ca.crt /etc/openvpn/server/1.10 Diffie-Hellman key를 만들어 준다.
$ ./easyrsa gen-dh 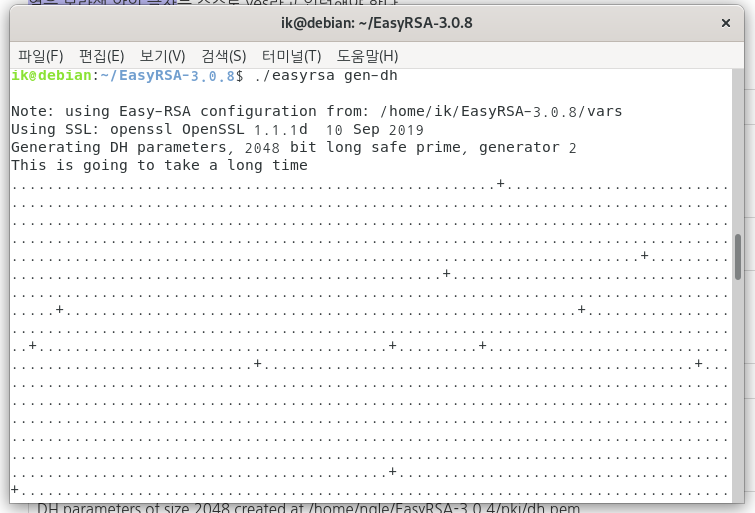
명령을 실행하면 점들이 찍히며 완료하는데 시간이 조금 걸린다.
결과로 아래와 같이 pem 파일이 만들어 졌다.
DH parameters of size 2048 created at /home/사용자 계정/easy-rsa/pki/dh.pem 1.11 openvpn을 이용해 ta.key 파일을 만든다.
$ sudo openvpn --genkey --secret ta.key 1.12 생성한 dh.pem 파일과 ta.key 파일을 openvpn 폴더로 복사한다.
$
$sudo cp ~/easy-rsa/ta.key /etc/openvpn/server/
sudo cp ~/easy-rsa/pki/dh.pem /etc/openvpn/server/서버에 대한 인증서는 이제 준비되었다.
2. VPN 계정 만들기
2.1 client에서 사용할 인증서 파일을 만든다.
client 인증서는 VPN 유저 1명당 발급해야 한다. 따라서 vpn 계정이 여러개일 경우 아래 명령을 반복해야 한다.
먼저 client 인증서를 모아둘 폴더를 하나 만든다.
$
$mkdir -p ~/client-configs/keys
chmod -R 777 ~/client-configs2.2 EasyRSA에서 vpn 계정에 대한 인증서를 만들어 준다.
vpn 계정을 abc으로 할겁니다. 그럼 easyrsa 명령의 gen-req 옵션에 abc라고 common name을 준다. nopass 도 옵션에 포함한다.
(옅은 녹색 안의 문자는 자신이 원하는 이름으로 적으면 된다)
$
$cd ~/easy-rsa/
./easyrsa gen-req abc nopass명령을 실행하면 아래와 같이 터미널 창 맨밑에 적혀져 있는 Common Name을 다시한번 확인한다.
-----
Common Name (eg: your user, host, or server name) [abc]:엔터를 치고 abc 계정 제작을 하면다음과 같은 세개의 문장이 나오면서 끝마친다.
Keypair and certificate request completed. Your files are:
req: /home/사용자 계정/easy-rsa/pki/reqs/abc.req
key: /home/사용자 계정/easy-rsa/pki/private/abc.key2.3 생성한 abc.key 파일을 클라이언트 keys 폴더(~/client-configs/keys)에 복사한다.
$ sudo cp pki/private/abc.key ~/client-configs/keys/ abc.key 파일로 인증서를 만들어 준다. request type은 client로 준다.
$ ./easyrsa sign-req client abc 그리고 인증서의 정보가 맞는지 확인한다.

Confirm request details: 에 yes를 입력하고 엔터를 누른다.
그럼 아래와 같이 인증서 파일이 만들어 진다.
Certificate created at: /home/사용자 이름/easy-rsa/pki/issued/abc.crt 2.4 만들어진 인증서 파일(.crt)도 클라이언트 keys 폴더에 복사한다.
$ sudo cp pki/issued/abc.crt ~/client-configs/keys/ 2.5 ca.crt 와 ta.key 파일도 클라이언트 keys 폴더로 복사한다.
$
$sudo cp ~/easy-rsa/ta.key ~/client-configs/keys/
sudo cp /etc/openvpn/server/ca.crt ~/client-configs/keys/파일을 쉽게 접근할 수 있게한다.
$ chmod -R 777 ~/client-configs openVPN 계정으로 사용할 계정의 인증서 준비가 되었다.
3. openVPN 설정
3.1 openVPN에서 제공한 sample config files를 복사하고 압축을 해제한다.
$
$sudo cp /usr/share/doc/openvpn/examples/sample-config-files/server.conf.gz /etc/openvpn/server
sudo gzip -d /etc/openvpn/server/server.conf.gz3.2 압축을 푼 server.conf 파일을 연다.
$ sudo nano /etc/openvpn/server/server.conf 
server.conf 파일의 글내용에서 수정해야 할 것은 다음과 같다.
1) dh를 파라미터 찾기
dh의 파라메터에 dh2048.pem으로 아래와 같이 되어있다.
# Diffie hellman parameters.
# Generate your own with:
# openssl dhparam -out dh2048.pem 2048
dh dh2048.pemEasyRSA가 생성하는 .pem파일이 이전에는 dh2048.pem이었는데 최근 버전에서는 dh.pem 파일로 생성되는 파일 이름이 변경되었다. (1.10 참고)
dh2040.pem에서 2048을 지우고 dh.pem 으로 변경한다.
# Diffie hellman parameters.
# Generate your own with:
# openssl dhparam -out dh2048.pem 2048
dh dh.pem2) VPN으로 접속한 Client의 DNS를 변경하기
# If enabled, this directive will configure
# all clients to redirect their default
# network gateway through the VPN, causing
# all IP traffic such as web browsing and
# and DNS lookups to go through the VPN
# (The OpenVPN server machine may need to NAT
# or bridge the TUN/TAP interface to the internet
# in order for this to work properly).
push "redirect-gateway def1 bypass-dhcp"push "redirect-gateway def1 bypass-dhcp" 앞의 주석( ; )을 제거한다.
그리고 바로 밑에있는 두 개의 push "dhcp-option 옵션도 주석( ; )을 제거한다.
# Certain Windows-specific network settings
# can be pushed to clients, such as DNS
# or WINS server addresses. CAVEAT:
# openvpn.net/faq.html#dhcpcaveats
# The addresses below refer to the public
# DNS servers provided by opendns.com
push "dhcp-option DNS 168.126.63.1"
push "dhcp-option DNS 168.126.63.2"하늘색의 밑줄 친 IP주소는 각각 VPN서버의 인터넷 공급업체 주DNS, 보조DNS 주소 두 개를 입력한다.
3) HMAC Section의 tls-auth를 찾기
tls-auth ta.key 0 이 주석이 제거되어 있는지 확인한다. 바로 밑에 key-direction 0을 추가한다.
# For extra security beyond that provided
# by SSL/TLS, create an "HMAC firewall"
# to help block DoS attacks and UDP port flooding.
#
# Generate with:
# openvpn --genkey --secret ta.key
#
# The server and each client must have
# a copy of this key.
# The second parameter should be '0'
# on the server and '1' on the clients.
tls-auth ta.key 0 # This file is secret
key-direction 0 #<-- 추가할 부분4) vpn 암호화
3)번 문단 바로 밑에 다음으로 cryptographic cipher Section의 cipher가 적혀져 있는 문단이 있다.
cipher AES-256-CBC가 주석이 제거되어 있는지 확인한다. 그리고 바로 밑에 auth SHA512를 추가한다.
# Select a cryptographic cipher.
# This config item must be copied to
# the client config file as well.
# Note that v2.4 client/server will automatically
# negotiate AES-256-GCM in TLS mode.
# See also the ncp-cipher option in the manpage
cipher AES-256-CBC
auth SHA512 #<-- 추가할 부분5) user와 group을 찾기
user와 group 앞에있는 주석( ; )을제거한다.
# It's a good idea to reduce the OpenVPN
# daemon's privileges after initialization.
#
# You can uncomment this out on
# non-Windows systems.
user nobody
group nogroup6) 패킷 전송 크기 지정
# Silence repeating messages. At most 20
# sequential messages of the same message
# category will be output to the log.
;mute 20다음과 같은 문단을 찾아서 아래와 같은 문단을 추가한다.
tun-mtu 1450
;fragment 0
mssfix 1410※ 자신의 집에 들어오는 MTU 및 MSS 값을 찾는 법 :
https://www.speedguide.net/analyzer.php? (SG TCP/IP Analyzer)
※ 명령 프롬프트를 이용해 자신의 집에 들어오는 적합한 MTU값 찾기
ping -f <ip주소> -l <MTU 값>
예) ping -f 192.168.100.1 -l 1450<선택사항 1>
port 변경하기
# Which TCP/UDP port should OpenVPN listen on?
# If you want to run multiple OpenVPN instances
# on the same machine, use a different port
# number for each one. You will need to
# open up this port on your firewall.
port 1194이 문단에서 port 번호를 변경하고 싶으면 port 옆의 1194라는 숫자를 변경하면 된다.
openVPN에는 port 번호를 1194로 값이 디폴트(default)로 설정되어 있다.
- tcp, udp 포트 형식 정하기 -
# TCP or UDP server?
;proto tcp
proto udpserver.conf 파일을 열면 기본적으로 위 문단과 같이 udp를 기본값으로 설정해있다.
tcp로 설정하고 싶으면 아래와 같이 proto udp앞에 ;를 입력하고, proto tcp 앞에 ;를 지운다.
# TCP or UDP server?
proto tcp
;proto udptcp를 사용하도록 수정했다면 explicit-exit-notify도 변경해줘야 한다.
explicit-exit-notify의 값을 0으로 변경합니다.
# Notify the client that when the server restarts so it
# can automatically reconnect.
explicit-exit-notify 1위 문단에서 밑줄 친 부분을 0으로 수정한다.만약에 tcp에서 udp로 vpn서버를 수정하려면 밑줄 친 부분을 1로 적는다.
<선택사항 2>
만약 앞서 서버 인증서를 만들때 server가 아닌 다른 이름으로 만들었다면 .crt와 .key파일의 이름을 변경해 줘야 한다.
이름을 server로 지정했으면 기본 설정인 server.crt와 server.key가 정상적인지만 확인만 한다.
# SSL/TLS root certificate (ca), certificate
# (cert), and private key (key). Each client
# and the server must have their own cert and
# key file. The server and all clients will
# use the same ca file.
#
# See the "easy-rsa" directory for a series
# of scripts for generating RSA certificates
# and private keys. Remember to use
# a unique Common Name for the server
# and each of the client certificates.
#
# Any X509 key management system can be used.
# OpenVPN can also use a PKCS #12 formatted key file
# (see "pkcs12" directive in man page).
ca server/ca.crt
cert server/server.crt
key server/server.key # This file should be kept secret3.3 openVPN server의 네트워크 설정을 변경해야한다.
먼저 ip forwarding이 되도록 설정해야 합니다.
/etc/sysctl.conf 파일을 열어서 net.ipv4.ip_forward=1로 수정합니다.
$ sudo nano /etc/sysctl.conf net.ipv4.ip_forward를 찾는다. 주석처리 되어 있다면 주석을 해제한다.
# Uncomment the next line to enable packet forwarding for IPv4
net.ipv4.ip_forward=1주석을 제거했다면 sysctl.conf 파일을 저장한다.
그리고 현재 열려있는 session에서 변경 사항을 적용한다.
$ sudo sysctl -p
net.ipv4.ip_forward = 13.4 방화벽(Ubuntu) 설정
VPN 서버로 들어오는 불필요한 트래픽을 제거하는 목적이다.
먼저 현재 네트워크의 인터페이스 이름을 확인해야 한다.
아래 명령으로 확인할 수 있다.
$ ip route | grep default
default via 192.168.0.1 dev enp3s0 proto dhcp metric 100예시에서 적혀져 있는 default gateway는 192.168.0.1로 되어 있다.
dev옆에있는 인터페이스 네임은 enp3s0 이다.
자신의 컴퓨터에는 예시와는 다르게 게이트웨이와 인터페이스 네임이 설정되어 있을것이다.
3.5 이제 ufw(방화벽) 설정을 연다.
만약 ufw를 설치하지 않았으면 설치하도록 한다.
$ sudo apt-get install ufw 그 다음 openVPN에서 사용할 roule을 추가한다.
$ sudo nano /etc/ufw/before.rules 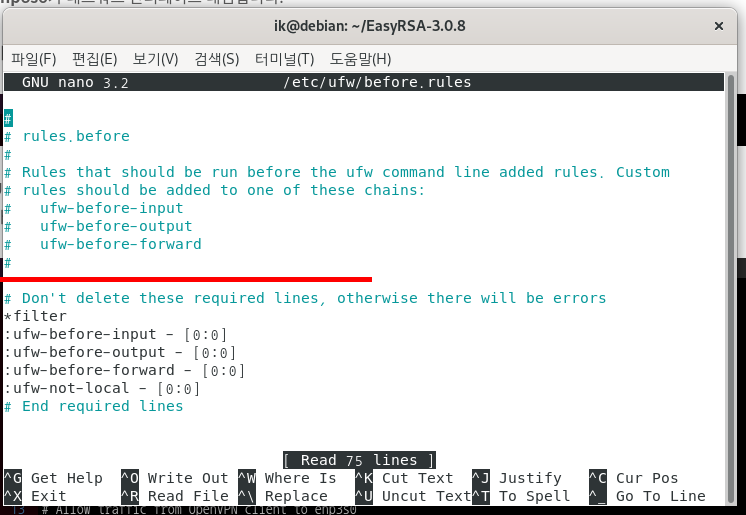
빨간 줄 밑에 아래의 문장을 추가한다
# START OPENVPN RULES
# NAT table rules
*nat
:POSTROUTING ACCEPT [0:0]
# Allow traffic from OpenVPN client to enp3s0
-A POSTROUTING -s 10.8.0.0/8 -o enp3s0 -j MASQUERADE
COMMIT
# END OPENVPN RULES
#옅은 빨간 네모박스 안의 글씨는 자신의 컴퓨터에 설정되어 있는 인터페이스 네임을 추가한다.
추가되는 rule은 이#START OPENVPN RULES 부터 #END OPENVPN RULES까지 내용이다.
추가되었다면 저장한다.
3.6 /etc/default/ufw 파일을 열고 DEFAULT_FORWARD_POLICY찾아 ACCEPT로 수정한다.
$ sudo nano /etc/default/ufw 
DEFAULT_FORWARD_POLICY는 DROP이라고 되어 있는 것을 ACCEPT로 변경한다.
# Set the default forward policy to ACCEPT, DROP or REJECT. Please note that
# if you change this you will most likely want to adjust your rules
DEFAULT_FORWARD_POLICY="ACCEPT"ufw 파일을 저장한다.
3.7 openVPN의 port와 프로토콜을 변경해 줬기 때문에 방화벽(ufw)에도 적용해야 한다.
openSSH도 추가해 준다.
$
$sudo ufw allow 1194/udp
sudo ufw allow OpenSSH옅은 초록색의 / 왼쪽에는 자신이 설정한 포트번호를, 오른쪽에는 자신이 설정한 tcp, udp 형태를 적는다.
3.8 방화벽 설정이 다 되었다면 ufw disable enable을 실행해 재시작 해준다.
$
$sudo ufw disable
sudo ufw enable4. openVPN 시작하기
4.1 openVPN을 시작한다. systemctl 명령으로 openVPN을 시작한다. openVPN 실행시 설정 파일은 /etc/openvpn/server/server.conf 파일을 사용하기 위해 아래의 문장으로 실행한다.
$ sudo systemctl start openvpn-server@server 명령을 실행해 리턴값이 없으면 정상적으로 실행하는 것이다.
systemctl status 옵션으로 확인해 본다.
$ sudo systemctl status openvpn-server@server 나갈려면 shift + q를 누른다
4.2 openVPN의 tun0 인터페이스도 확인해 준다.
$ ip addr show tun0 4.3 서버가 reboot되어도 자동으로 시작되도록 설정한다.
$ sudo systemctl enable openvpn-server@server 부팅되도 실행을 하지 않으려면 다음과 같은 문장을 입력한다.
$ sudo systemctl disable openvpn-server@server openVPN을 중지하는 명령어는 다음과 같다.
$ sudo systemctl stop openvpn-server@server 5. Client 추가 설정
5.1 먼저 만들었단 clinet-configs 폴더 아래 files라고 하위 폴더를 만들어 준다.
$ mkdir -p ~/client-configs/files 5.2 client configuration 샘플파일을 client-configs 폴더에 복사한다.
$ sudo cp /usr/share/doc/openvpn/examples/sample-config-files/client.conf ~/client-configs/base.conf 5.3 복사한 base.conf 파일을 열고 수정한다.
$ sudo nano ~/client-configs/base.conf 1) ip 및 포트번호 설정
# The hostname/IP and port of the server.
# You can have multiple remote entries
# to load balance between the servers.
remote my-server-1 1194remote를 찾아 빨간색 칸에는 집으로 공급되는 ip주소 및 DDNS주소, 노란색 강조선 안에는 server.conf를 설정할 때 입력한 포트번호를 입력한다. 포트번호를 건드리지 않았으면 그대로 둔다
위 문단 바로 위 문단에 포트형식을 udp 가 아니라 tcp로 설정했으면 proto tcp 앞에 주석( ; )을 지우고, proto udp 앞에 주석(;) 넣는다.
# Are we connecting to a TCP or
# UDP server? Use the same setting as
# on the server.
proto tcp
;proto udp2) user와 group 앞의 주석(;)을 제거한다.
# Downgrade privileges after initialization (non-Windows only)
user nobody
group nogroup3) SSL/TLS parms. Section을 찾아 ca, cert, key 설정을 모두 주석 처리 한다.
# SSL/TLS parms.
# See the server config file for more
# description. It's best to use
# a separate .crt/.key file pair
# for each client. A single ca
# file can be used for all clients.
#ca ca.crt
#cert server.crt
#key server.key4) cipher와 auth를 찾아 server의 config와 동일하게 수정한다.
cipher는 AES-256-CBC 그대로이며 auth SHA256은 추가해 준다.
그 다음 auth 밑에 key-direction 1 을 추가해 준다.
# Select a cryptographic cipher.
# If the cipher option is used on the server
# then you must also specify it here.
# Note that v2.4 client/server will automatically
# negotiate AES-256-GCM in TLS mode.
# See also the ncp-cipher option in the manpage
cipher AES-256-CBC
auth SHA512
key-direction 15) 다음과 같은 항목을 찾는다.
# Silence repeating messages
;mute 20이 항목 밑에 다음과 같은 항목을 추가한다.
tun-mtu 1450
;fragment 0
mssfix 14106) 제일 마지막 줄에 아래 항목을 주석처리 한 채 추가해 준다. 추가되는 항목은 리눅스 클라이언트에서 사용하는 항목들이다.
# script-security 2
# up /etc/openvpn/update-resolv-conf
# down /etc/openvpn/update-resolv-conf설정이 완료되었다면 파일을 저장을 한다.
5.4 simple script를 만들 순서이다.인증서와 key 파일들을 구성하고 ~/client-configs/files 경로에 생성하게 해준다.
~/client-configs 폴더 안애 make_config.sh 라고 파일을 만들어 준다.
$ sudo nano ~/client-configs/make_config.sh make_config.sh 파일안에 아래와 같이 추가한다.
#!/bin/bash
# First argument: Client identifier
KEY_DIR=/home/사용자 이름/client-configs/keys
OUTPUT_DIR=/home/사용자 이름/client-configs/files
BASE_CONFIG=/home/사용자 이름/client-configs/base.conf
cat ${BASE_CONFIG} \
<(echo -e '<ca>') \
${KEY_DIR}/ca.crt \
<(echo -e '</ca>\n<cert>') \
${KEY_DIR}/${1}.crt \
<(echo -e '</cert>\n<key>') \
${KEY_DIR}/${1}.key \
<(echo -e '</key>\n<tls-auth>') \
${KEY_DIR}/ta.key \
<(echo -e '</tls-auth>') \
> ${OUTPUT_DIR}/${1}.ovpn사용자 이름은 자신이 쓰고 있는 계정이름을 적는다
make_config.sh 파일을 저장한다.
5.5 아래와 같이 권한을 준다.
$ sudo chmod 777 ~/client-configs/make_config.sh 사용자를 구성할 설정이 완료되었다.
6. ovpn파일 만들기
6.1 client-configs 폴더로 이동해 2번 vpn 계정을 만들 때 적었던 계정을 (예에는 abc 계정) openVPN 계정으로 만든다.
$
$cd ~/client-configs
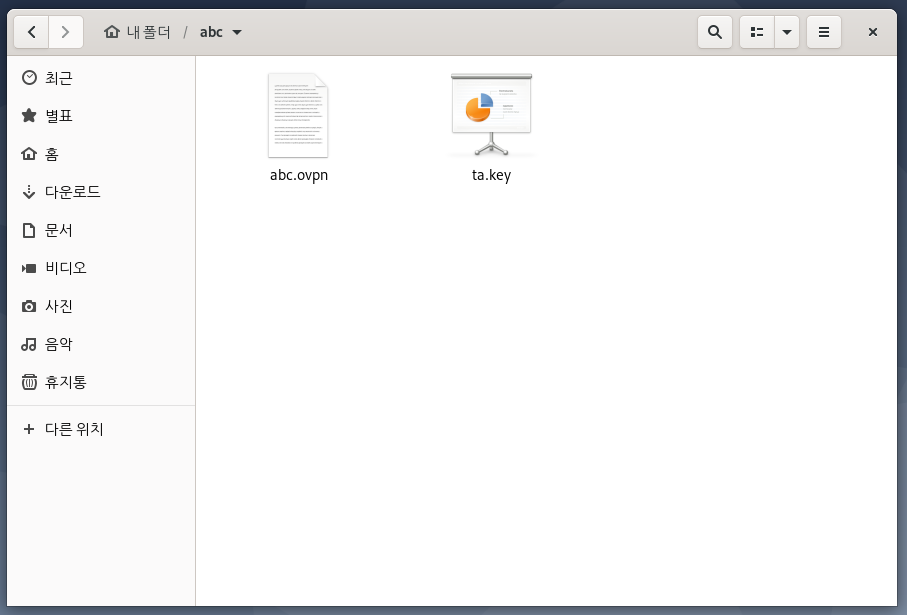
./make_config.sh abcmake_config.sh <인증서를 만든 계정>을 실행하면 ~/client-configs/files 안에 계정 이름(예에는 abc)으로된 .ovpn 파일이 생성이 된다.

ovpn 파일을 얻으려면 홈 -> client-config -> files 순으로 들어가야 한다. 7. 공유기에 포트포워딩 설정하기
터미널 창에 hostname -I를 입력해서 엔터치면 vpn서버를 구동하려는 컴퓨터의 내부 ip가 왼쪽에 나타난다.
알아낸 내부ip주소와 설정한 포트번호와 형식으로 공유기에 알맞는 포트포워딩을 설정한다. ()포트포워딩을 설정하면 외부에서 vpn을 접속할 수 있다.
추가적으로 공유기에 방화벽 설정되어 있으면 해제해야 VPN이 잘 작동된다.
8. vpn 실행하려는 기기에 ovpn 설치하기
윈도우
다운로드 링크
openvpn.net/community-downloads/
Community Downloads | OpenVPN
Visit this page to download the latest version of the open-souce VPN, OpenVPN.
openvpn.net
안드로이드
안드로이드에서는 Google Play Store에서 를 다운받을 수 있다.
play.google.com/store/apps/details?id=net.openvpn.openvpn&hl=ko&gl=US
OpenVPN Connect – Fast & Safe SSL VPN Client - Google Play 앱
WHAT IS OPENVPN CONNECT? OpenVPN Connect is the official VPN application for Android developed by OpenVPN, Inc. It is a universal client serving the following OpenVPN products: ⇨ Access Server – self-hosted VPN solution for businesses ⇨ OpenVPN Cloud
play.google.com
자신이 만들었던 ovpn파일과 ta.key 파일을 같이 압축하고 실행하고자 하는 기기에 넣고 같이 풀어서 vpn을 접속을 한다. ta.key 파일은 ~/client-configs/keys/ 파일에 위치해 있다.
참고자료
- openVPN 설치 (on Ubuntu 18.04)
- How To Set Up an OpenVPN Server on Debian 9
링크 : www.digitalocean.com/community/tutorials/how-to-set-up-an-openvpn-server-on-debian-9
- 리눅스 / 명령어 / systemctl
링크 : www.manualfactory.net/10507
- OPENVPN MTU: FINDING THE CORRECT SETTINGS
링크 : https://www.thegeekpub.com/271035/openvpn-mtu-finding-the-correct-settings/
- Easy-RSA, Archlinux
링크 : https://wiki.archlinux.org/title/Easy-RSA#OpenVPN_server_files
최초발행
2020/11/08 17:21